
Ever stared at your ad spend and thought, “I know this is working… probably… I think?” Yeah, I’ve been there. You’re running campaigns, leads are coming in, but somewhere between “clicked the ad” and “paid the invoice,” the story goes completely dark. That’s exactly the problem a proper GoHighLevel revenue tracking setup solves and honestly, once it’s done, it changes everything.
This guide walks you through the whole picture: UTM attribution, pipeline configuration, automated ROI calculation, and dashboards that actually tell you which marketing dollars are pulling their weight.
To connect your marketing spend to real closed revenue in GoHighLevel, you need to: (1) capture UTM data via custom fields and hidden form inputs, (2) configure your pipeline with mandatory attribution fields, (3) build a Closed Won workflow that auto-calculates ROI, and (4) create a live dashboard showing revenue by lead source. No spreadsheets required.
Why Most GHL Accounts Are Flying Blind
Here’s a scenario I see constantly.
A roofing client spends $4,000 on Google Ads in a month, six leads come in through a GHL funnel, and every single contact record shows “Source: direct.” The client asks which keywords are working. You have nothing.
That’s not a reporting problem. That’s a setup problem. And it’s fixable.
Most GHL attribution problems are not reporting problems. They are handoff problems.
The data exists, it just never gets captured cleanly. Fix the handoff, and the reporting takes care of itself.
Step 1: Build Your UTM Attribution Foundation
Before your pipeline can report on revenue, your forms need to capture where every lead came from.
When a visitor lands on a GHL page with UTM parameters in the URL, GHL reads those values and stores them in a session cookie. On the contact record, scroll down to the Attribution panel and you’ll find fields for Session Source, Session Medium, and Session Campaign.
But here’s the catch: GHL does capture UTM data out of the box, but with constraints that will burn you if you don’t understand them.
Native session fields aren’t always usable inside workflows, dashboards, or client reports. So we go one step further.
Map UTMs to Custom Fields
To ensure accurate tracking, include hidden fields in your forms that capture session data like `utm_source` and `utm_medium`. Map this information to custom fields for each contact during form submission.
Add three hidden fields to your form: `revenue` (leave blank initially), `ad_spend` (pre-populate with your cost per lead), and `lead_source` (auto-fill based on UTM source).
That’s your attribution trifecta and it costs you nothing but fifteen minutes of setup time.
Don’t Forget Click IDs
For precise campaign attribution, integrate tools like UTM parameters, the Facebook Pixel, and the Conversion API.
Google sends a `gclid`, Meta sends an `fbclid`, and both need to be captured as custom fields too.
Fire conversion pixels back to Google and Meta when a lead books, shows, or closes so ad platforms optimize on real revenue, not clicks.
That’s how you stop paying for clicks that never close.
Step 2: Configure Your Pipeline for Revenue Data
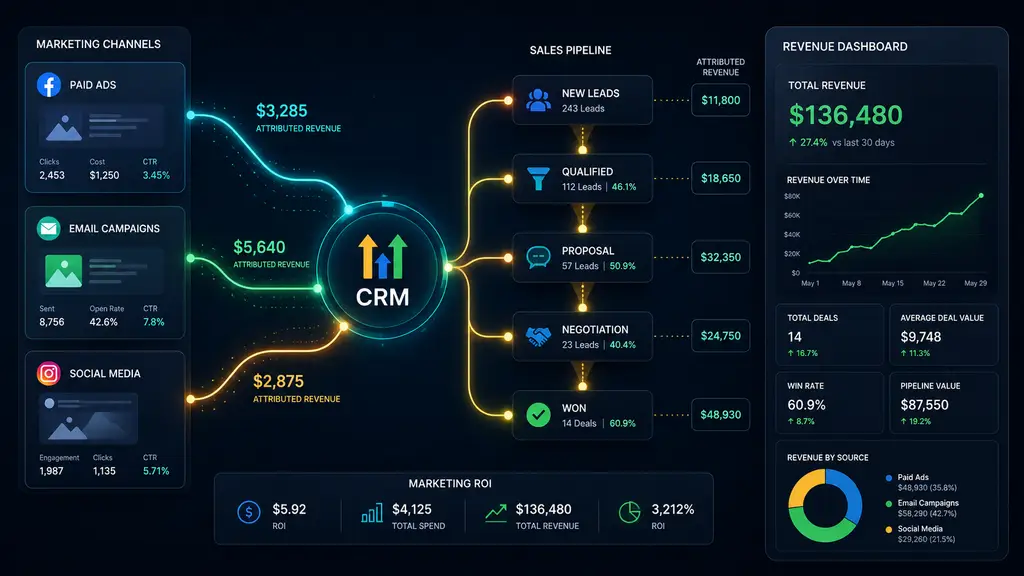
A pipeline without revenue data is just a pretty kanban board. We need it to be a money map.
Start by creating custom fields for revenue, ad spend, and lead source; these will help you track the necessary data. Next, configure your opportunity pipelines to monitor this information effectively.
Make fields like `lead_source` and `acquisition_cost` mandatory in your pipeline to prevent missing attribution data as deals progress.
Think of it like requiring a shipping address before checkout; you simply can’t move forward without it.
Stage Your Pipeline with Revenue Intent
Here’s a real-world structure I love for service businesses: an HVAC company uses a GHL pipeline with stages: New Lead → Estimate Scheduled → Quote Sent → Job Booked → Completed → Review Requested. Every stage triggers an automatic follow-up sequence.
Each stage transition is a data event. And data events are where revenue tracking lives.
Visualize every stage of your sales process, from initial inquiry to deal closure, ensuring no opportunity slips through.
Step 3: Automate Your ROI Calculation Workflow
This is my favorite part the moment the machine does the math for you.
For automated ROI calculations, set up a workflow triggered by an Opportunity Stage change specifically when a lead moves to “Closed Won.” Use custom fields to record revenue and acquisition costs, then calculate ROI using this formula: (Revenue – Ad Spend) / Ad Spend × 100.
That single workflow fires every time a deal closes and stamps the ROI directly onto the contact record. No Excel. No manual calculations. And No guessing at 11pm before a client call.
Certain GoHighLevel automations consistently yield outsized returns: appointment scheduling and reminders, lead qualification sequences, abandoned form or cart recoveries, and cross-sell/upsell journeys triggered by pipeline stage changes.
Layer those on top of your revenue tracking workflow and you’ve got a compounding system, not just a report.
Reduce No-Shows to Protect Revenue
While we’re automating, don’t skip this one.
Appointment reminders and confirmations using the platform’s SMS and email channels are straightforward to set up and typically reduce no-shows by 20–40%, recovering lost revenue quickly.
A booked job that doesn’t show up is a $0 job that still costs you ad spend. That hurts your ROI numbers just as much as a bad campaign.
Step 4: Build the HighLevel UTM Attribution Reporting Dashboard
Now we make it visual. Because a number buried in a custom field isn’t a dashboard it’s homework.
GoHighLevel’s dashboard builder lets you create custom reports that calculate and display ROI by source in real time. Navigate to Reporting → Dashboards → Create New Dashboard. Name it “Lead Source ROI Tracker” or something equally direct.
Here’s what your dashboard should include:
First widget: Revenue by Lead Source. Choose a bar chart. Set the data source to Opportunities, filter by stage “Closed Won,” group by `lead_source`, and display sum of deal revenue. This shows which sources generate the most revenue.
Also add: Pipeline Value by Stage (shows where revenue is sitting), Cost Per Lead by Campaign, Appointment Rate (leads booked ÷ total leads by source), and Close Rate by Lead Source.
That last one is a showstopper.
The close rate by lead source widget is where attribution earns its value. It can show clients that their Google Search leads close at 22% while their Facebook leads close at 9% and you can shift budget accordingly.
That’s not a vanity metric. That’s a business decision hiding in plain sight.
Share It With Clients (Without Giving Them the Keys)
For clients who need real-time visibility, share the GHL reporting dashboard via the Client View permission level. They see the numbers; they can’t touch the settings.
Everyone stays happy, and nobody accidentally deletes a workflow at 2am. We’ve all had that nightmare.
Step 5: Connect Marketing Spend to Booked Jobs
Here’s where the full loop closes. You’ve got UTMs flowing in, pipeline stages capturing source data, a Closed Won workflow calculating ROI, and a live dashboard showing the whole picture. Now you can answer the only question that actually matters: *Which marketing spend turns into booked jobs?*
To measure the financial impact of workflows and automations, focus on a small set of KPIs: lead response time, contact-to-booking rate, no-show rate, customer acquisition cost (CAC), lifetime value (LTV), and average revenue per client.
The businesses that get the most out of it start by tightening one revenue path, proving the system works, and then expanding with discipline. That is the practical way to use HighLevel well: one defined process, one tested workflow, one clean reporting loop, and one account structure that stays usable as the business grows.
Start with your highest-volume lead source. Get that attribution clean. Then expand. Trying to track everything at once is like trying to eat the whole pizza in one bite, technically possible, mostly regrettable.
FAQ: GoHighLevel Revenue Tracking Setup
Q: Do I need third-party tools like Zapier to track ROI in GoHighLevel?
Not necessarily.
You can track ROI by lead source directly in GoHighLevel using custom fields, opportunity pipelines, and native dashboards. Set up three custom fields (revenue, ad spend, source), configure your pipeline to capture source data, build a dashboard widget to display ROI by channel, and automate the calculation with a workflow that runs when deals close. No Zapier, no spreadsheets, no third-party analytics.
That said, Zapier or Make can help sync ad spend data from your ad platforms automatically if you want real-time cost figures.
Q: What happens to attribution if a lead comes in through a third-party integration or API?
Good question and an important one.
A workflow, Zapier step, Make scenario, or API integration creates the contact, and GHL reports the source as “Third-Party.”
To avoid this, always pass UTM values as custom field data through your integration payload, not just as URL parameters. That way the attribution sticks even when the lead didn’t come through a native GHL form.
Q: How do I make sure attribution data doesn’t go missing mid-pipeline?
Set up pipelines with automated triggers to guide leads through your sales process, and use workflows with attribution variables to segment contacts and send notifications.
More importantly, make your attribution fields mandatory at the pipeline level so no opportunity can advance without a lead source attached. Treat missing source data the same way you’d treat a missing phone number: don’t let it through.
Stop Guessing, Start Knowing
A solid GoHighLevel revenue tracking setup isn’t just a nice-to-have it’s the difference between marketing that feels productive and marketing you can *prove* is profitable. UTMs capture the source, custom fields preserve the data, pipelines structure the journey, workflows calculate the ROI, and dashboards make the whole story visible at a glance.
The setup takes a few focused hours. The payoff is knowing with real numbers exactly which campaigns are filling your pipeline and which ones are just filling your ad platform’s pockets.
Ready to stop flying blind? Start with Step 1 today: map your UTMs to custom fields and build from there. One clean data point leads to the next, and before you know it, you’ve got a revenue tracking system your whole team (and your clients) will actually trust.
Sign up for a GoHighLevel Account today and get a 14 Day Free Trial.